
2. Programs in files
In this chapter we will start to learn how to combine pieces of code into larger units, and how to package up your code so that you or others can do the same. You may previously have written Python code in Jupyter notebooks, and possibly used an interactive Python environment such as IPython. Jupyter notebooks are an excellent platform for writing and documenting short pieces of code. However, they are much less good for writing code which is designed to be used by other people. If the intention is to write mathematical building blocks out of which more complex algorithms can be constructed, then we need a different way of storing code: one which is accessible in more automated ways than typing in a web browser. As an introduction to writing code in files, we will first consider Python scripts. We’ll then move on to making code really reusable by creating Python modules and packages.
2.1. The Python interpreter
Before we dive into the various different ways that Python code can be organised and run, it’s helpful to have a mental model of what it actually means for Python code to execute. Python is an interpreted language. This means that the program that runs is not made up of the primitive machine-level instructions that the processor in your computer executes. Instead, the Python program is read and executed by another piece of software, the Python interpreter. The Python interpreter takes a sequence of Python statements and performs the actions they specify. The interpreter takes care of allocating the required memory and causes the right sequences of primitive machine-level instructions to execute on the actual hardware such that your programme runs.
The Python interpreter is the same no matter whether you use Jupyter notebooks, an interactive Python terminal such as IPython, or execute code written in Python scripts. These are all just different ways of providing a sequence of Python commands to the interpreter, and conveying the output back to the user. This means that the same Python code works in essentially the same way no matter how you use Python. The Python interpreter also sits between the Python code and the operating system, so for most purposes, it also doesn’t matter whether your Python program is running on Windows, macOS, Linux, or maybe something more exotic. Usually, when we refer to Python doing something or responding to code in a particular way, what we mean is that this is what the interpreter does in those circumstances.
2.1.1. IPython
If you’ve only ever used Jupyter notebooks, then you won’t yet have encountered
a purely command line interface to the Python interpreter. You can launch a
command line Python interface simply by running the command python with no
further arguments. However, a much more user-friendly interface with features
such as syntax highlighting, tab completion and a searchable command history is
provided by IPython. If you’re familiar with Jupyter notebooks then IPython
will be very familiar indeed, because the Python backend to Jupyter is IPython.
IPython is available as a package on PyPI. So, having ensured that our venv is active, we can install it by running:
(PoP_venv) $ python -m pip install ipython
IPython can now be run by simply typing:
(PoP_venv) $ ipython
This will result in output similar to the following:
Python 3.11.0 (main, Oct 25 2022, 14:13:24) [Clang 14.0.0 (clang-1400.0.29.202)]
Type 'copyright', 'credits' or 'license' for more information
IPython 8.6.0 -- An enhanced Interactive Python. Type '?' for help.

In [1]:
Just as in a Jupyter notebook, this last line is the Python prompt at which you can type any Python you like. If you press return after a complete Python statement, the statement will execute immediately. Unlike in a Jupyter notebook, there is no special key combination or button to trigger execution. We’ll use IPython from time to time to illustrate the operation of the various Python constructs that we’ll learn about. However, our focus is on building larger units of code, and it is to this that we will now turn.
2.2. Python scripts and text editors
A Python script is simply a plain text file containing Python code. If we pass the file to the Python interpreter, then all the code in the file will be executed, it’s that simple. So, we need a way to create files full of Python code, and a way to feed them to Python. We create and edit Python files with a program called a text editor. A good text editor will help you to code by highlighting syntax and helping with indentation. Some text editors also feature advanced features such as built-in access to documentation, or highlighting style problems in your code. A more fully-featured option is an integrated development environment (IDE). IDEs combine an editor with a Python interpreter to run your code, a debugger and often other features such as integration with Git.
One such IDE is Microsoft Visual Studio Code. This is a free and open source IDE with good support for Git and Python, including for debugging Python programmes. It also has a particularly helpful Live Share facility, which enables two or more programmers to work on the same piece of code at the same time over the internet. The descriptions presented here will assume that you are using Visual Studio Code, but you can, of course, use another editor or IDE for your Python programming.
Note
Text files
You are doubtless familiar with the concept of a file stored in a folder on your computer. You will also be aware that there are many different types of file, more or less related to the type of data they contain and the programs which created them. Files fall into two important categories, binary files and text files. A binary file is a stream of data whose contents make sense under the rules of the application which created it, but not otherwise. Word documents, PDFs, and JPEGs are examples of binary files. Plain text files are files which, as the name suggests, consist of a string of characters. Anyone looking at the content of a text file can understand it, so long as they understand the human or computer language in which it is written. LaTeX source files and Python scripts are examples of text files. This matters when you come to edit these files. Text files are edited using a text editor, or an IDE. Usually you can use whichever text editor you like, though some will have better support for writing some computer languages than others. Importantly, you can’t edit text files in a program such as Microsoft Word and expect to end up with something usable.
2.2.1. Setting up a Visual Studio Code workspace
Over the course of this book, you will work in a number of git repositories, each containing the exercises for one chapter. In order for Visual Studio Code to correctly find all the configuration files you need it to, it’s helpful to use what is called a Multi-root Workspace. This is simply a way of telling Visual Studio Code that we have multiple folders containing code. Once we start using Visual Studio Code’s style checking features in Chapter 4, this will ensure that the style rules we intend to apply to each repository are selected correctly.
Open Visual Studio Code, and from the file menu select open folder. Choose
the top level workspace folder that you created in Section 1.2.1
(you might have called this principles_of_programming). You should now
be able to see this folder name in the Explorer panel on the left of the
Visual Studio Code screen, with the name of your venv folder beneath it.
Next, we need to save this workspace. From the file menu select Save
Workspace As... and click the save button (there’s no need to change
the filename). You’ll see a file called something like
principles_of_programming.code-workspace appear in the Explorer
panel. This file contains workspace settings, and you can also click on it in
your operating system’s file explorer to start Visual Studio Code in this
workspace.
Finally, let’s create a test folder in which we’ll create our first Python
script. Open a terminal by clicking on the New Terminal item in the
Terminal menu of Visual Studio Code. Type the following:
$ mkdir test
You should see the test folder appear in the Explorer panel. However,
we haven’t yet told Visual Studio Code to treat test as a top level code
folder. To do that, choose Add Folder to Workspace from the file menu, and
select the test folder. This will cause the folder to appear alongside the
workspace folder in the Explorer tab. Fig. 2.1 shows a
workspace in this configuration.
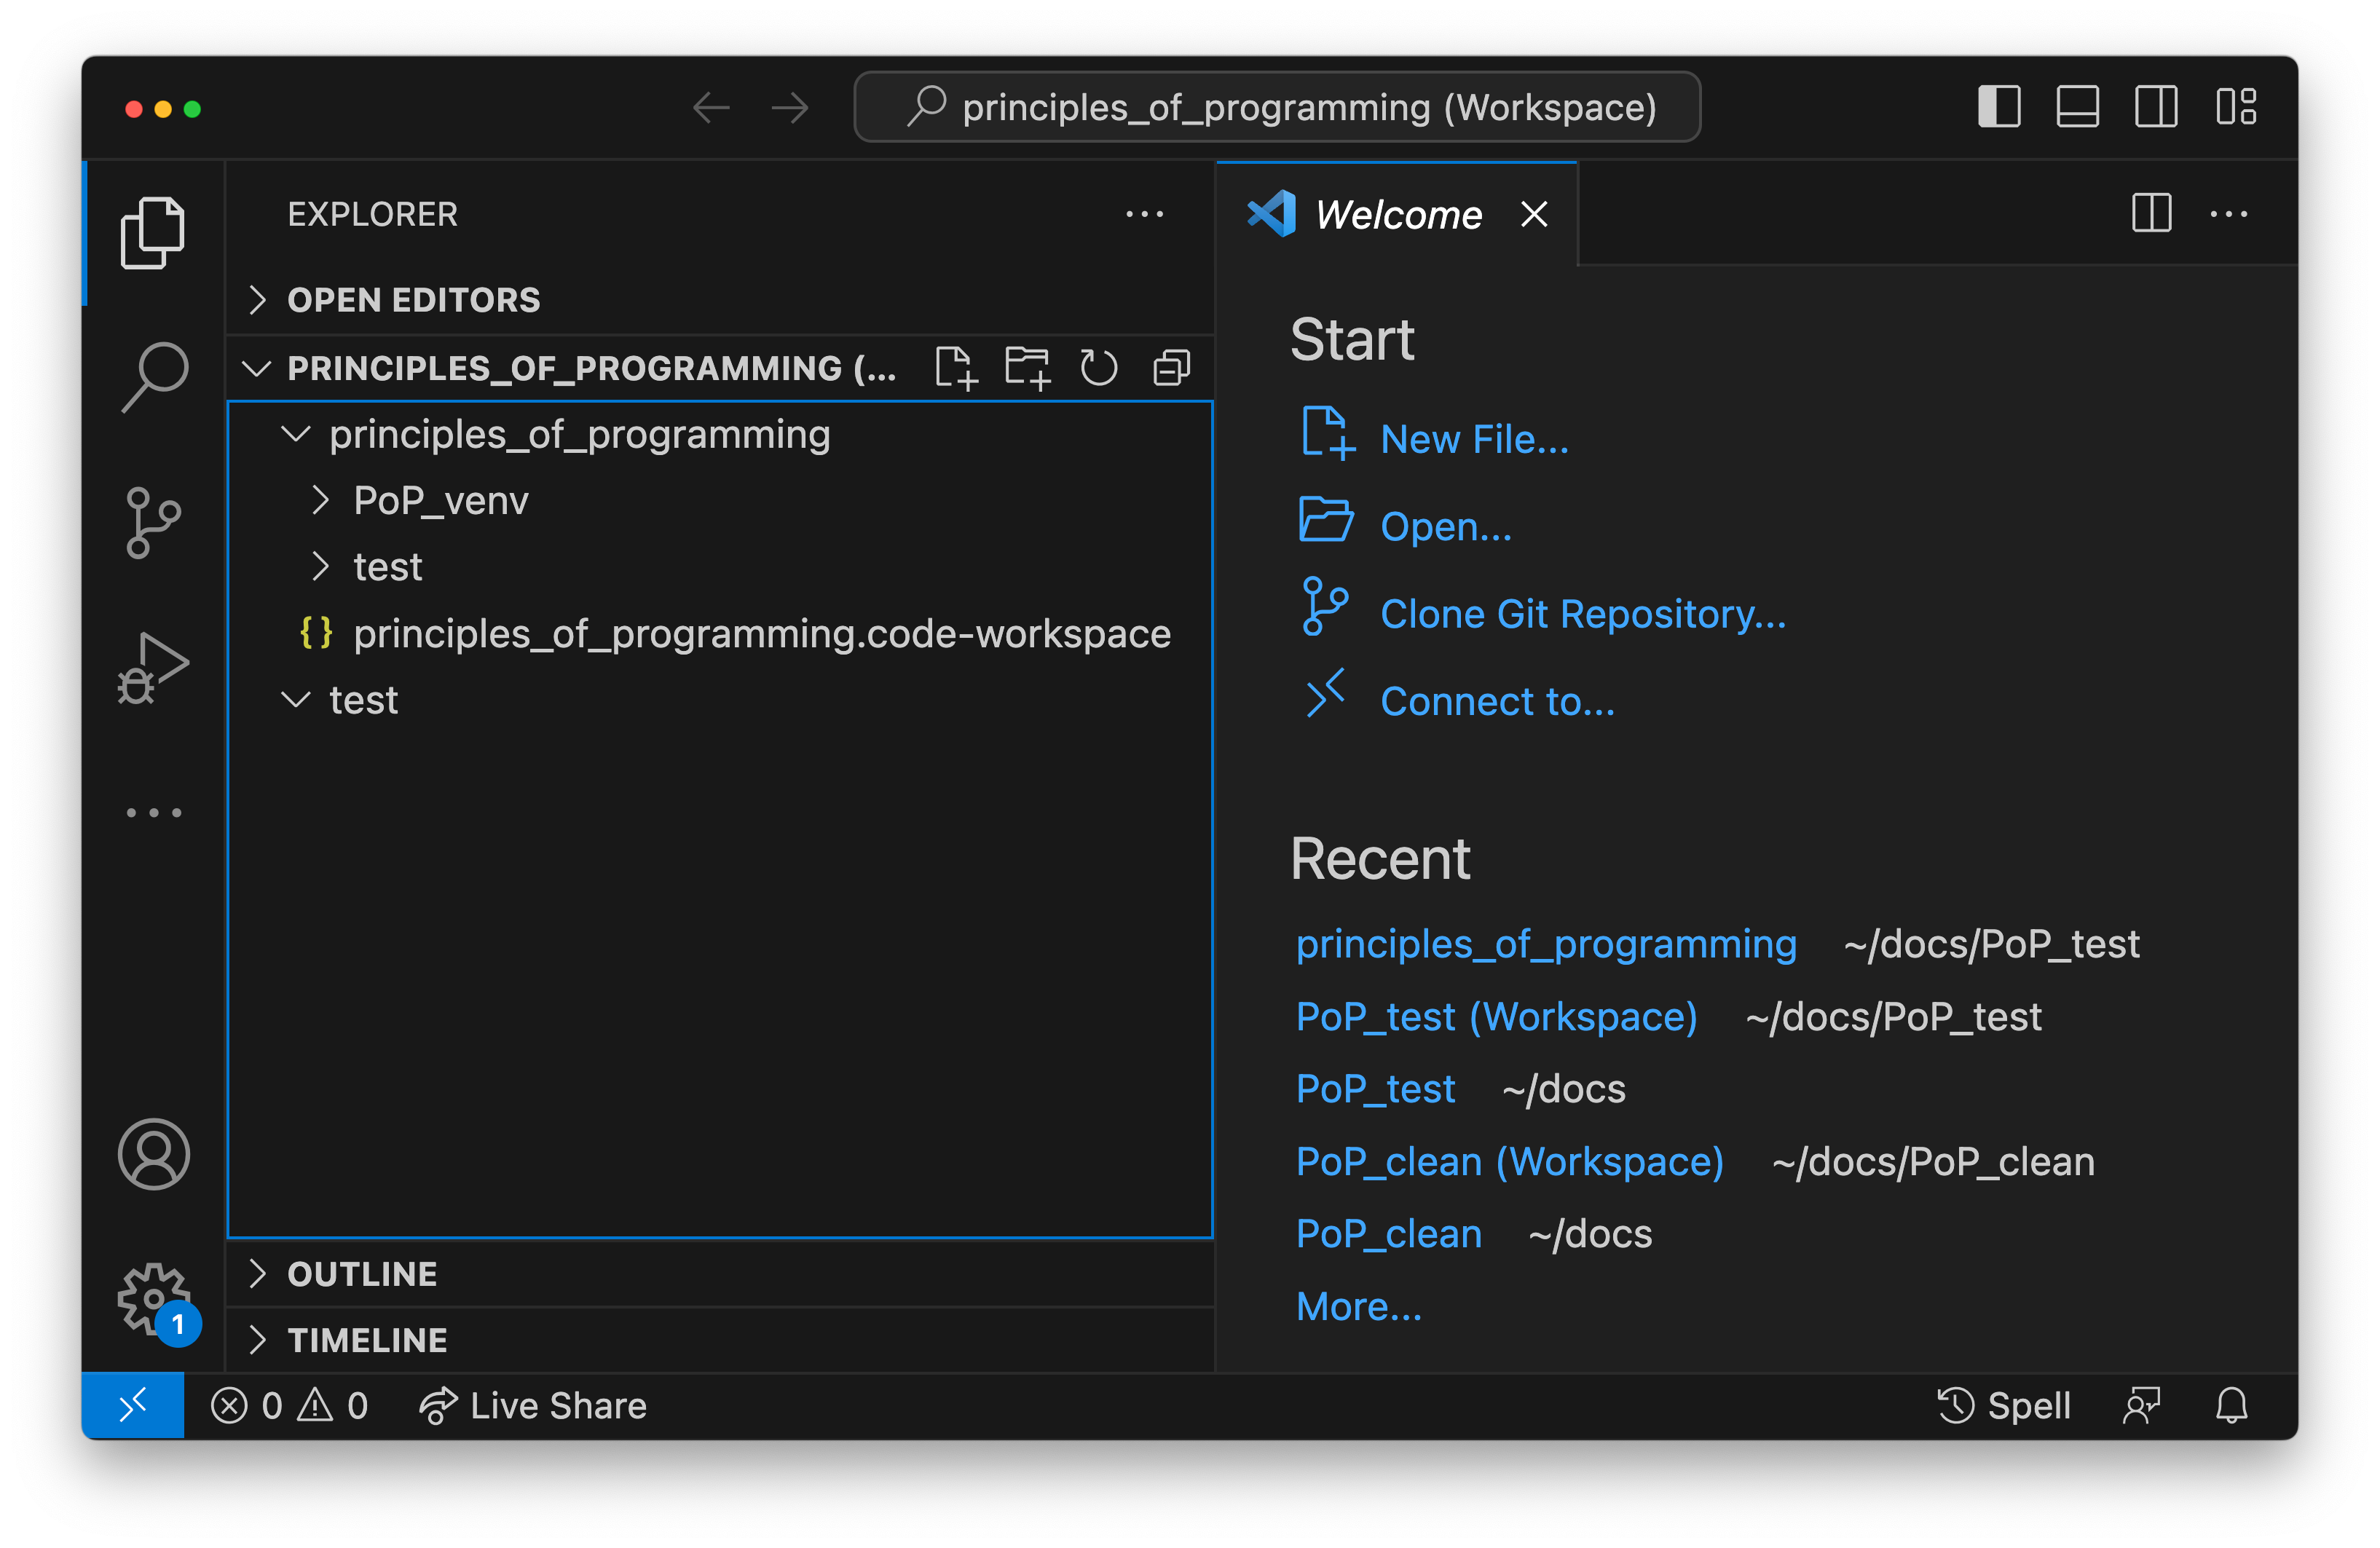
Fig. 2.1 The Visual Studio Code debugging window showing a multi-root workspace
containing the top level principles_of_programming folder, as
well as the test folder. Note that the test folder
is also visible inside the principles_of_programming folder.
2.2.2. A first Python script
Tradition dictates that the first stand-alone program one writes in any
language simply prints out the string Hello World. Using an IDE or text
editor, we create a file in our test folder, which we’ll call
hello.py containing just the following line of Python code:
print("Hello World")
The .py file extension is not strictly required for Python scripts, but
it can be useful as it will cause most text editors to recognise the file as a
Python file. Having remembered to save hello.py to disk from the text
editor, we can now run the program. Open a terminal, and activate your virtual
environment. Next, change to test
folder. On most operating systems, you would type the following:
(PoP_venv) $ cd test
(PoP_venv) $ python hello.py
The first of these commands,
cd (change directory) switches the current folder to test. The
second command actually runs the Python interpreter on hello.py. From
within our venv, we can be confident that python will refer to the right
version of Python. When we press the
enter key after the last line above, our tiny Python script
hello.py runs and the following is displayed:
Hello World
2.2.3. When to use scripts
The key advantage of a script is that it is repeatable: it can be run again, and exactly the same commands will execute. Writing scripts is an absolutely essential programming discipline in any circumstance where you might want to know what you did and, possibly, do it again. For example, suppose you have a project in a computational statistics course, in which you need to apply a complex sequence of operations to a dataset and then plot some resulting quantities. You could simply do this in an interactive Python session, but you are then totally dependent on your memory as to what you did. If you make a mistake, then you might notice an error in the final result, but you will almost certainly not recall the inadvertent mistake that led to it.
Conversely, had you written every step you took as a Python script which outputs the final plot to a pdf for inclusion in your report, you can go back over your work and find the error. A particularly frustrating phenomenon, often encountered shortly before a submission deadline, is to suddenly discover that something which used to work no longer does. If you took the next logical step and committed your scripts to a Git repository, making a new commit every time you edit it, you would also be able to go back and find the point at which the script stopped working. We will return to this debugging technique in Section 8.7.2.
Hint
Whenever you need to perform a calculation as a part of an assignment or project, or as part of your job, always write a script to perform the calculation and store that script under revision control. Adopting this simple practice will save you enormous amounts of frustration and wasted time over the course of your career.
2.2.4. When not to use scripts
The one thing that scripts can do is run. This makes them an exceptional tool for reproducing calculations. However, as mathematicians and programmers, we are also interested in building tools which users can combine together in different ways. We also want to make functions and other code objects which can be reused in different contexts to perform more complex computations. Functions and other data structures defined in a script can essentially only be used in that script. As soon as a piece of code is intended to be used in two different scripts, it should be taken out and placed in a module. This means that scripts should usually be quite short lists of calls out to code in modules. We’ll see a simple example of this shortly.
2.3. Modules
A module is, like a script, a plain text file containing Python
code. Modules must have names ending in .py. So far, that’s
identical to a script. Indeed, it’s sometimes possible (though not
always advisable) to use the same file as both a script and a
module. The difference between a script and a module lies in how it is
used. A script is run, which means that a new Python interpreter
starts, executes the commands in the script, and then
exits. Conversely, a module is imported into a running Python
session. For example, suppose we create a file fibonacci.py
containing the following simple function:
def fib(n):
    """Return the n-th Fibonacci number."""
    if n == 0:
        return 0
    elif n == 1:
        return 1
    else:
        return fib(n-2) + fib(n-1)
If we now run IPython in the folder containing our new file
fibonacci.py then we will be able to import the fibonacci
module, and use the function fib():
In [1]: import fibonacci
In [2]: fibonacci.fib(3)
Out[2]: 2
Notice that we do not include the .py suffix when we import a
module. Importing a module provides access to whatever it
contains. This is a key tool in building up algorithms out of
components: we import the components we need at each stage of our
programs.
2.3.1. Importing and namespaces
When we imported the module fibonacci, this created the name
fibonacci in the current environment. The code in fibonacci.py is
then run, and any names defined in that code (such as the function
fib()) are defined within the namespace fibonacci. As
we begin to compose together code from different parts of mathematics,
the ability to separate identically named but different objects from
each other is essential. For example, Python has a module containing
core real-valued maths functions called math, and one
containing complex maths functions called
cmath. Clearly, it’s important that we can distinguish
between math.sin() and cmath.sin(). Here the
module names math and cmath form the namespaces that
differentiate between the two sin() functions.
There are essentially only two core namespace concepts. One of them is that
every name is in a namespace, and any given time points to a unique value. The
second one is that namespaces can be nested, so a name in a namespace can
itself be another namespace. For example, the math namespace contains the value
math.pi, which itself defines a namespace for some operations that are
built into Python numbers. The (somewhat uninteresting) imaginary part of π can
be accessed as math.pi.imag.
Namespaces are a simple but fundamental concept in programming. To quote one of the key developers of the Python language:
Namespaces are one honking great idea – let’s do more of those! [1]
Note
Namespaces may look unfamiliar at first, but actually, they are such a natural concept that you have been working with them for as long as you have used a computer, without even thinking about it. This is because folders are simply namespaces for files. Each filename can exist only once in each folder, and folders can be nested inside folders.
2.3.2. Other forms of import
Importing modules into their own namespaces is frequently what we
want: it clearly separates the names in the module from the names we
have defined ourselves, and makes it very obvious to a reader where
the names come from. The downside is that names in namespaces can be
quite long and cumbersome, which is particularly inconvenient if names
are to be used frequently or in the middle of expressions: you probably
don’t really want to write math.sin() in every trig formula you
ever write. One alternative is to rename the module on import. This is
achieved using the keyword as in an import statement. For example,
it is usual to import the numerical Python module numpy in the
following way:
import numpy as np
This creates the local name np instead of numpy,
so that the function for creating an evenly spaced sequence of values
between to end points is now accessible as np.linspace.
A second option is to import particular names from a module directly
into the current namespace. For example, if we planned to use the
functions math.sin() and math.cos() a lot in our script, we
might use the following import statement:
from math import sin, cos
Now we can use the names sin and cos directly. What if we also wanted to use a short name for
their complex counterparts? We can’t have two functions with the same
name in a single namespace. Fortunately, the keyword as
comes to our rescue again:
from cmath import sin as csin, cos as ccos
Renaming on import is a double-edged sword. You must always take care that renaming does not add to the confusion. As a somewhat extreme example, should you ever type the following code, you should expect the wrath of your users to be without bounds:
from math import sin as cos, cos as sin
It is possible to import all of the names from a module into the current namespace:
from math import *
Now everything in the math module can be used without a namespace
prefix. This may seem superficially attractive, but actually importing
* is a frequent source of problems. For starters, if you import *
from more than one module, it becomes impossible for the reader of the
code to work out from which module each name comes. Further, if a
module from which you import * contains a name that you have already
used, then the meaning of that name will be overwritten with the one
from the module (without any warning or error). This is a frequent
source of confusion. For this reason, importing * is usually a bad
idea.
The full details of all the ways that the import statement can be used is in the official Python Language Reference.
2.4. Packages
Modules are the principal mechanism for storing code which is intended to be used by other code. However, putting all of the code for a complex area of mathematics in a single huge Python file is not a great idea. Readers of that code will struggle to see the logical structure of thousands or tens of thousands of lines of code. It would be much more logical, and much easier to work with, to split the code up into several files of more reasonable length. This is where packages come in. A Python package is a collection of module files, which can be imported together. The basic folder structure of a Python package is shown in Listing 2.1.
my_git_repo
├── my_package
│   ├── __init__.py
│   ├── module_1.py
│   ├── module_2.py
│   └── subpackage
│       ├── __init__.py
│       └── module_3.py
└── pyproject.toml
If you haven’t seen a diagram like this before, the names with lines descending from their first letter are folder names, and the descending line connects the folder name to the files and folders it contains. Let’s walk through these files and folders to understand how they make up the Python package.
my_git_repoThis is not really a part of the package at all, but the
my_packagefolder needs to be in some folder, and this is a reminder that all your work should be in a revision control system such as Git. It is usual for package folders to be contained immediately in the top level of the repository, in the manner shown here.my_packageThis is the actual package. The name of this folder sets the package name, so if you really made a package folder with this name, then you would type:
import my_package
to access the package.
__init__.pyEvery package must contain a file with exactly this name. This is how Python recognises that a folder is a package.
__init__.pycan be an empty file, or it can contain code to populate the top level namespace of the package. See Section 2.4.1 below.module_1.py,module_2.pyThese are just Python modules. If the user imports
my_packageusing the line above then these modules will appear asmy_package.module_1andmy_package.module_2respectively.subpackagePackages can contain packages. A subpackage is just a folder containing a file
__init__.py. It can also contain modules and further subpackages.pyproject.tomlThis file is outside the package folder and is not actually a part of the package. The role of
pyproject.tomlwill be covered in Section 2.4.2.
2.4.1. Importing packages
The system for importing packages is the same as that described for modules in
Section 2.3, though the nested nature of packages makes the process
somewhat more involved. Importing a package also imports all the modules it
contains, including those in subpackages. This will establish a set of nested
namespaces. In the example above, let’s suppose we have imported
my_package. module_3 will be accessible as
my_package.subpackage.module_3. The usual rules about the from keyword
still apply, so:
from my_package.subpackages import module_3
would import the name module_3 straight into the current local
namespace.
The file __init__.py is itself a module and will be imported when
the package is imported. However, names defined in __init__.py will
appear directly in the namespace of the package. This is usually used
to extract names from submodules that are supposed to be directly
accessed by users of the package.
For example, suppose that module_1 contains a function
my_func. Then the top level __init__.py in my_package might contain
the line:
from .module_1 import my_func
The result of this would be that the user of my_package would be
able to access my_func as my_package.my_func (though
my_package.module_1.my_func would also work). This sort of
arrangement provides a mechanism for the programmer to arrange the
internal module structure of a package in a logical way while still
providing users with direct access to the most important or most
frequently used features.
The eagle-eyed reader will have noticed the extra . in front of
module_1. This marks this import as a relative import. In other
words, in looking for module_1.py, Python should look for files in
the same folder as the module where the import statement occurs,
instead of looking for an external package called module_1. We could
have equivalently written:
from my_package.module_1 import my_func
but the relative import is shorter and provides a reminder to the reader that the import is from the current package.
2.4.2. Making packages installable
In order for the import statement to work, Python needs
to know that the package being imported exists, and where to find it. This is
achieved by installing the package using Pip. In order to make a package
installable, we need to provide Pip with a bit more information about it. The
modern way to provide this information is using a configuration file which must
be called pyproject.toml. This file isn’t part of the package and does
not go in the package folder. Instead, it should be placed in the top-level
folder of your git repository, so that the Python package installer will be
able to find it.
[build-system]
requires = ["hatchling"]
build-backend = "hatchling.build"

[project]
name = "my_package"
version = "0.1"

[tool.hatch.build.targets.wheel]
packages = ["my_package"]
Listing 2.2 shows a very basic pyproject.toml.
This isn’t a Python file, instead it’s a configuration file written in a
language called TOML. In our case, the TOML file
comprises three sections, which TOML calls “tables”.
The first table is called build-system, and enables us to choose which of the
various Python project management packages we wish to use. For our very simple
package we’ll use hatchling which is part of the Python project management
system Hatch. There are a number of other packages
we could have used for this, but for our simple purposes it doesn’t much matter
which we use. Inside tables, TOML records configuration information as
key-value pairs. There are two keys that we must set in the build-system
table. requires is a list of packages that Pip should install in order to
build this package. In this case, that is just hatchling. The second key we
need is build-backend. This is the name of the Python module that will be
used to build the package. For hatchling this is the build module in so we
write hatchling.build.
The project table contains information about the Pip package we’re creating.
At a minimum, we need to give our Pip package a name and a version number.
Finally, the packages key in the [tool.hatch.build.targets.wheel] table
contains the list of Python package folders to be included.
This very simple pyproject.toml will suffice for packages that you
only intend to use yourself. Should you wish to publish packages for use by
other people, then you’ll need to provide significantly more information in
pyproject.toml and, potentially, in other places too. The canonical
guide to this is the Python Packaging User Guide.
2.4.3. Installing a package from local code
In Section 1.3.1 we learned how to use Pip to install packages from the online Python package repository, PyPI. However, Pip can also be used to install a package from a folder on your computer. In this case, you would type:
(PoP_venv) $ python -m pip install -e folder/
replacing folder with the name of the top-level folder of your
repository: the folder containing pyproject.toml. The option flag -e tells
Pip to install the package in ‘editable’ mode. This means that instead of
copying the package files to your venv’s Python packages folder, symbolic links
will be created. Consequently, any changes that you make to your package will
show up the next time the package is imported in a new Python process, avoiding
the need to reinstall the package every time you change it.
The name folder in the example above is an example of a relative path. This
means that folder is located relative to the folder in which the command
python -m pip is run. It often happens that a user wants to install the
package whose pyproject.toml is in the current folder. In this case
it’s helpful to know that the special relative path . refers to the
current folder. So to install the package defined in the current folder, type:
(PoP_venv) $ python -m pip install -e .
Warning
If you edit a package, even one installed in editable mode, an already running Python process which has already imported that package will not notice the change. This is a common cause of confusion for users who are editing packages and testing them using an interactive Python tool such as IPython or a Jupyter Notebook. A major advantage of a Python script is that a new Python process is started every time the script is run, so the packages used are guaranteed to be up to date.
2.4.4. Pip packages and Python packages
One frequent source of confusion in making packages installable and actually
installing them is that Pip and Python have slightly different definitions of
what constitutes a package. A Python package, as we have just learned, is a
folder containing (at least) a file called __init__.py. For Pip,
however, a package is everything that pyproject.toml installs, which
could include any number of Python packages.
2.4.5. Package dependencies
There is one more feature of Pip packages that it is useful to introduce at
this stage: dependencies. If you write a package and the modules in that
package themselves import other packages, then a user will need those packages
to be installed in their Python environment, or your package will not work. If
your package depends on other packages that need to be installed from PyPI then
steps need to be taken to ensure that your users will have the correct packages
installed. The dependencies key in the project table provides a list of
packages on which the current package depends. Pip will install any of these
packages that are not already available before installing the package itself.
Listing 2.3 illustrates this by adding a dependency on
numpy.
pyproject.toml from
Listing 2.2 to require that numpy is installed.¶[build-system]
requires = ["hatchling"]
build-backend = "hatchling.build"
[project]
name = "my_package"
version = "0.1"
dependencies = ["numpy"]
[tool.hatch.build.targets.wheel]
packages = ["my_package"]
Note
It is important to understand the difference between the requires key in
the build-system table and the dependencies key in the project table.
The former is a list of packages needed to build the package, while the
latter is a list of packages needed to use the current package. You will
often need to specify dependencies but, unless you are doing something
quite advanced such as writing Python packages in another programming
language, you will not need to add to requires.
Warning
Neither dependencies nor requires should list packages from the Python
Standard Library. These are always available, and listing them will cause
Pip to error.
2.5. Testing frameworks
Attempting to establish whether a program correctly implements the intended algorithm is core to effective programming, and programmers often spend more time correcting bugs than writing new code. We will turn to the question of how to debug in Chapter 8. However, right from the start, we need to test the code we write, so we will cover the practical details of including tests in your code here.
There are a number of Python packages which support code testing. The concepts are largely similar so rather than get bogged down in the details of multiple frameworks, we will introduce Pytest, which is one of the most widely used. Pytest is simply a Python package, so you can install it into your current environment using:
(PoP_venv) $ python -m pip install pytest
2.5.1. Pytest tests
A Pytest test is simply a function whose name starts with test_. In the
simplest case, the function has no arguments. Pytest will call each such
function in turn. If the function executes without error, then the test is
taken to have passed, while if an error occurs then the test has failed. This
behaviour might at first seem surprising - we don’t just want the code to run,
it has to get the right answer. However, if we think about it the other way
around, we certainly want the test to fail if an error occurs. It’s also very
easy to arrange things such that an error occurs when the wrong answer is
reached. This is most readily achieved using the assert statement. This simply consists of assert followed by a Python
expression. If the expression is true, then execution just continues, but if
it’s false, then an error occurs. For example:
--------------------------------------------------------------------------
AssertionError                           Traceback (most recent call last)
Cell In [1], line 1
----> 1 assert 1==0

AssertionError:
2.5.2. Pytest files
Pytest looks for tests in files whose name starts with test_ and
ends with .py. Continuing with our Fibonacci example, we might
create a file called test_fibonacci.py containing:
from fibonacci import fib

def test_fibonacci_values():

    for i, f in enumerate([1, 1, 2, 3, 5, 8]):
        assert fib(i+1) == f
These files don’t themselves form part of the package, instead they are usually gathered in a separate tests folder. For example:
fibonacci
├── fibonacci
│   ├── __init__.py
│   └── fibonacci.py
├── tests
│   └── test_fibonacci.py
└── pyproject.toml
We can then invoke the tests from the shell:
(PoP_venv) $ cd fibonacci
(PoP_venv) $ python -m pytest tests
========================== test session starts ===========================
platform darwin -- Python 3.7.7, pytest-5.4.1, py-1.8.1, pluggy-0.13.1
rootdir: /Users/dham/docs/object-oriented-programming, inifile: setup.cfg
collected 1 item

 .                                          [100%]

=========================== 1 passed in 0.01s ============================
The single dot indicates that we passed the one test in
test_fibonacci.py. Had we made an error in our code, we would
instead see something like:
(PoP_venv) $ python -m pytest tests
========================== test session starts ===========================
platform darwin -- Python 3.7.7, pytest-5.4.1, py-1.8.1, pluggy-0.13.1
rootdir: /Users/dham/docs/object-oriented-programming, inifile: setup.cfg
collected 1 item

tests/test_fibonacci.py F                                          [100%]

================================ FAILURES ================================
_________________________ test_fibonacci_values __________________________

    def test_fibonacci_values():

        for i, f in enumerate([1, 1, 2, 3, 5, 8]):
>           assert fib(i+1) == f
E           assert 2 == 1
E            +  where 2 = fib((1 + 1))

tests/test_fibonacci.py:6: AssertionError
======================== short test summary info =========================
FAILED tests/test_fibonacci.py::test_fibonacci_values - assert 2 == 1
=========================== 1 failed in 0.12s ============================
Here we can see an F after tests/test_fibonacci.py indicating
that the test failed, and we see some output detailing what went
wrong. We will learn how to interpret this output in Chapter 6.
2.5.3. Additional useful Pytest tricks
It can be useful to run a specific test file, which is achieved simply by naming that file as the argument to Pytest. For example:
(PoP_venv) $ python -m pytest tests/test_fibonacci.py
It is even possible to select an individual test to run, using a double colon
:: followed by the test name:
(PoP_venv) $ python -m pytest tests/test_fibonacci.py::test_fibonacci_values
Often if one test fails then the same problem in your code will cause a whole
series of tests to fail, resulting in a very long list of error messages which
is hard to read. A useful tool in this circumstance is the -x option, which
tells Pytest to stop after the first test fail. For example:
(PoP_venv) $ python -m pytest -x tests
The tests are often arranged in increasing order of sophistication, so the earlier tests are likely to catch the most basic errors in your code. For this reason, it is usually the best policy to try to fix the first error first, and only move onto the next problem when the previous test passes.
Note
The exercise repositories that accompany this book will contain a
tests folder full of tests that check that you have correctly
implemented the chapter’s exercises. You should get in the habit of running
the tests as you work through the exercises, as they are designed not just
to pass if your code is correct, but to provide feedback as to what might
be going wrong if your code contains errors.
2.6. Writing code to a specified interface
Creating more capable programs depends completely on being able to interface different pieces of code. You will write code which calls code written by other people, and others will call code written by you. This can only work if the caller and the callee agree exactly on the interface: what are the names of the packages, modules and functions being called. How many arguments do they take? What are the names of the keyword parameters? Computer languages are notoriously pedantic about such things: they have no capability to simply read through small differences as a human would. You have doubtless already encountered the frustrating situation of spending extended periods repeatedly getting errors until you realised that something has to be spelt slightly differently, or that you used a capital letter where you should have used a lower case one.
What changes as you move on to write code which will be called by other code is that this need for precision and pedantry now flows in both directions. Not only do you need to call other code using precisely the correct interface, you also need to provide precisely the correct interface to the code that will call you. This is particularly true when working with a testing framework, as the tests for each exercise will call your code. The exercises will specify what the correct interface is, either in the exercise question itself, or through the skeleton code which is provided.
Your code needs to follow exactly the specification in the exercise: all the right names, accepting arguments of the correct type and so on. If it does not, then the tests will simply fail. Changing the tests to suit your preferred interface is not an acceptable answer, your code needs to comply with the interface specified in the tests.
This requirement to code to a published specification is not an artifact of the testing framework: it is often the case that code written in a research or business setting needs to conform with a standard or other published interface exactly to create the sort of interoperability we’ve been discussing. Learning to code to specification is therefore an important programming skill.
2.7. Glossary
- module
A text file containing Python code which is accessed using the import statement.
- namespace
A collection of names. Within a single namespace, each name has a single defined meaning. Names in different spaces can be referred to using the syntax
namespace.namewherenamespaceis an name for the namespace. namespaces are themselves named, so they can be nested (namespace.inner_namespace.name).- package
A grouping of related modules into a single importable unit.
- Python interpreter
The piece of software which interprets and executes Python commands.
- scope
The scope of a name is the section of code for which that name is valid.
- script
- program
A text file containing a sequence of Python statements to be executed. In Python, program and script are synonymous.
2.8. Exercises
Before attempting the exercises, ensure that you have obtained the software tools described in Section 1.1 and set up a working folder and virtual environment as described in Section 1.2. If you’re not already familiar with Git and GitHub then you will also need to work through Appendix 2 to learn enough to do the exercises.
Visit the GitHub repository for this book. Clone that git repository into your course folder, and install the Python package it contains into your virtual environment. Check that it has installed correctly by installing Pytest, and running:
(PoP_venv) $ python -m pytest tests/test_fibonacci.py
You could also run IPython, import fibonacci and try out
fibonacci.fib yourself.
Using the information on the book website
create your chapter 2 exercise repository for this module and clone it
into your working folder. The exercise repository just contains a
README and some tests. Your job in the following exercises will be
to populate it with the remaining content.
In your week 2 exercise repository, create a new Python package
named math_utils containing a module called primes.
In the primes module define a function isprime() which takes
in a single integer argument and returns True or False depending on
whether or not the argument is prime. There is no need use a sophisticated
algorithm, simply checking whether the number is zero modulo any of the
integers less than its square root will be fine. Test your code by running
the following in the exercise repository:
(PoP_venv) $ python -m pytest tests/test_exercise_2_3.py
Then push your code to GitHub and check that the tests pass there too.
Hint
The Python modulo operator is %. For example:
In [1]: 4 % 3
Out[1]: 1
Note
After this and every exercise in which you write code, ensure that you add any new files to Git, commit all of your changes, and push to GitHub. Then ensure that the tests pass on GitHub. For more information about how to do any of these, refer to Appendix 2.
Following Section 2.4.2, create a pyproject.toml
file in your exercise repository, so that the math_utils
package is installable.
Pytest can’t easily test installability for you, so once you have managed to install your package yourself, commit and push to GitHub to check that the tests there are also able to install your package.
Add an import to math_utils.__init__.py so that the following
code will work:
from math_utils import isprime
Footnotes